表格
表格中插入图片
网上的做法1
- 直接在单元格写
\includegraphics(需导入graphicx包)。进一步地,也可以用minipage环境包裹 - 为了使其它单元格内容居中,使用
\raisebox{-.5\height}{...}强制将文本抬高
\begin{table}[!h]
\renewcommand{\arraystretch}{1.5}
\centering
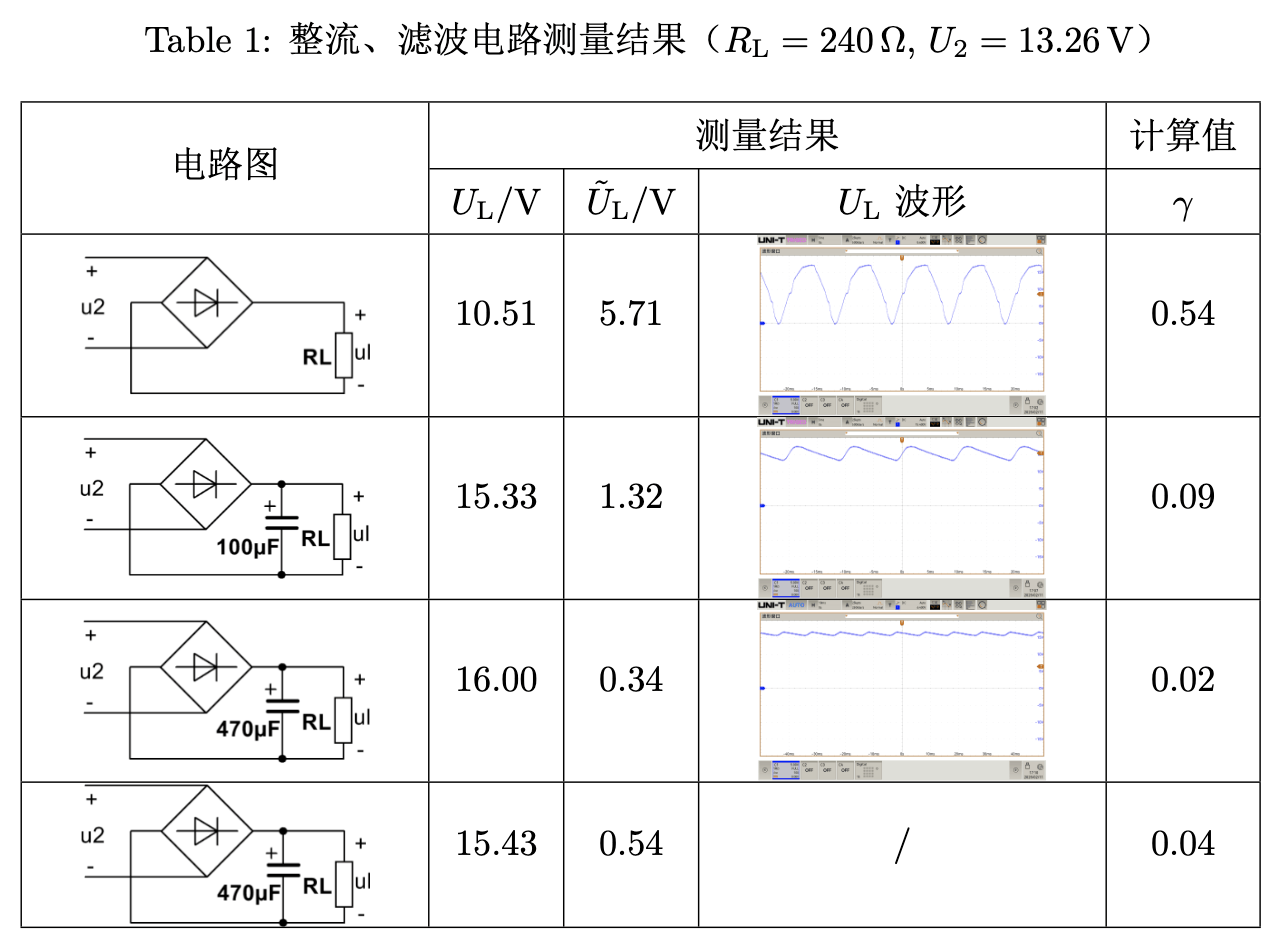
\caption{整流、滤波电路测量结果($R_{\mathrm{L}} = 240 \,\Omega,\, U_2 = 13.26 \,\mathrm{V}$)}
\begin{tabular}{|c|c|c|c|c|}
\hline
\multirow{2}{*}{电路图} & \multicolumn{3}{c|}{\makecell[c]{测量结果}} & 计算值 \\ \cline{2-5}
~ & $U_{\mathrm{L}}$/V & $\tilde{U}_{\mathrm{L}}$/V & $U_{\mathrm{L}}$ 波形 & $\gamma$ \\ \hline
\begin{minipage}[b]{0.2\columnwidth}
\centering
\raisebox{-.5\height}{\includegraphics[width=0.8\linewidth]{figures/电路1.png}}
\end{minipage} & 10.51 & 5.71 & \begin{minipage}[b]{0.2\columnwidth}
\centering
\raisebox{-.5\height}{\includegraphics[width=0.8\linewidth]{figures/out1.png}}
\end{minipage} & 0.54 \\ \hline
\begin{minipage}[b]{0.2\columnwidth}
\centering
\raisebox{-.5\height}{\includegraphics[width=0.8\linewidth]{figures/电路2.png}}
\end{minipage} & 15.33 & 1.32 & \begin{minipage}[b]{0.2\columnwidth}
\centering
\raisebox{-.5\height}{\includegraphics[width=0.8\linewidth]{figures/out2.png}}
\end{minipage} & 0.09 \\ \hline
\begin{minipage}[b]{0.2\columnwidth}
\centering
\raisebox{-.5\height}{\includegraphics[width=0.8\linewidth]{figures/电路3.png}}
\end{minipage} & 16.00 & 0.34 & \begin{minipage}[b]{0.2\columnwidth}
\centering
\raisebox{-.5\height}{\includegraphics[width=0.8\linewidth]{figures/out3.png}}
\end{minipage} & 0.02 \\ \hline
\begin{minipage}[b]{0.2\columnwidth}
\centering
\raisebox{-.5\height}{\includegraphics[width=0.8\linewidth]{figures/电路4.png}}
\end{minipage} & 15.43 & 0.54 & / & 0.04 \\ \hline
\end{tabular}
\label{tab:out1}
\end{table}
效果:
问题
图片的高度和单元格高度完全一致(顶格了),没有留出空隙。
解决方案
不使用 \raisebox,而是使用 \adjustbox 包的 valign=c 选项来垂直对齐图片,同时通过 margin 选项来调整图片的上下边距。
完整代码:
\begin{table}[!h]
    \renewcommand{\arraystretch}{1.5}
    \centering
    \caption{整流、滤波电路测量结果($R_{\mathrm{L}} = 240 \,\Omega,\, U_2 = 13.26 \,\mathrm{V}$)}
    \begin{tabular}{|c|c|c|c|c|}
        \hline
        \multirow{2}{*}{电路图} & \multicolumn{3}{c|}{\makecell[c]{测量结果}} & 计算值 \\ \cline{2-5}
        ~ & $U_{\mathrm{L}}$/V & $\tilde{U}_{\mathrm{L}}$/V & $U_{\mathrm{L}}$ 波形 & $\gamma$ \\ \hline
        \begin{minipage}[b]{0.2\columnwidth}
        \centering
        \adjustbox{margin={0pt \smallskipamount}, valign=c}{\includegraphics[width=0.8\linewidth]{figures/电路1.png}}
        \end{minipage} & 10.51 & 5.71 & \begin{minipage}[b]{0.2\columnwidth}
        \centering
        \adjustbox{margin={0pt \smallskipamount}, valign=c}{\includegraphics[width=0.8\linewidth]{figures/out1.png}}
        \end{minipage} & 0.54 \\ \hline
        \begin{minipage}[b]{0.2\columnwidth}
        \centering
        \adjustbox{margin={0pt \smallskipamount}, valign=c}{\includegraphics[width=0.8\linewidth]{figures/电路2.png}}
        \end{minipage} & 15.33 & 1.32 & \begin{minipage}[b]{0.2\columnwidth}
        \centering
        \adjustbox{margin={0pt \smallskipamount}, valign=c}{\includegraphics[width=0.8\linewidth]{figures/out2.png}}
        \end{minipage} & 0.09 \\ \hline
        \begin{minipage}[b]{0.2\columnwidth}
        \centering
        \adjustbox{margin={0pt \smallskipamount}, valign=c}{\includegraphics[width=0.8\linewidth]{figures/电路3.png}}
        \end{minipage} & 16.00 & 0.34 & \begin{minipage}[b]{0.2\columnwidth}
        \centering
        \adjustbox{margin={0pt \smallskipamount}, valign=c}{\includegraphics[width=0.8\linewidth]{figures/out3.png}}
        \end{minipage} & 0.02 \\ \hline
        \begin{minipage}[b]{0.2\columnwidth}
        \centering
        \adjustbox{margin={0pt \smallskipamount}, valign=c}{\includegraphics[width=0.8\linewidth]{figures/电路4.png}}
        \end{minipage} & 15.43 & 0.54 & / & 0.04 \\ \hline
    \end{tabular}
    \label{tab:out1}
\end{table}
效果:
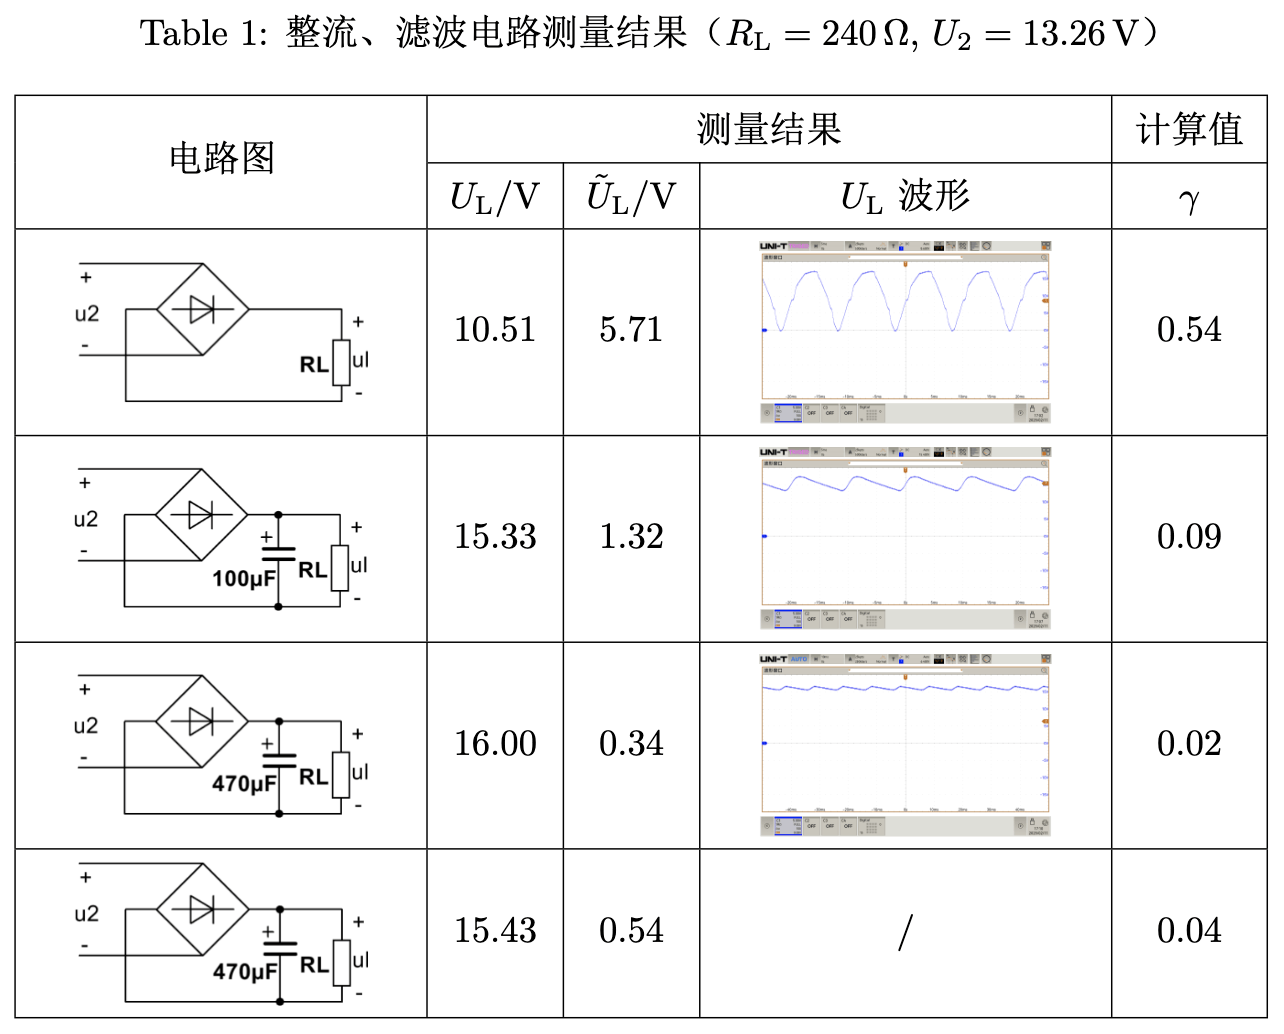
强迫症表示终于爽咧
